Fully Autonomous YouTube Channel
Lately I’ve noticed a lot of similar YouTube channels popping up in my feed. I could go at length trying to describe this format to you or just give you an example. I think the latter would be easiest:
That video specifically has 19k views at the time of writing this. And there’s more like it, just type “Reddit” into the YouTube search bar:
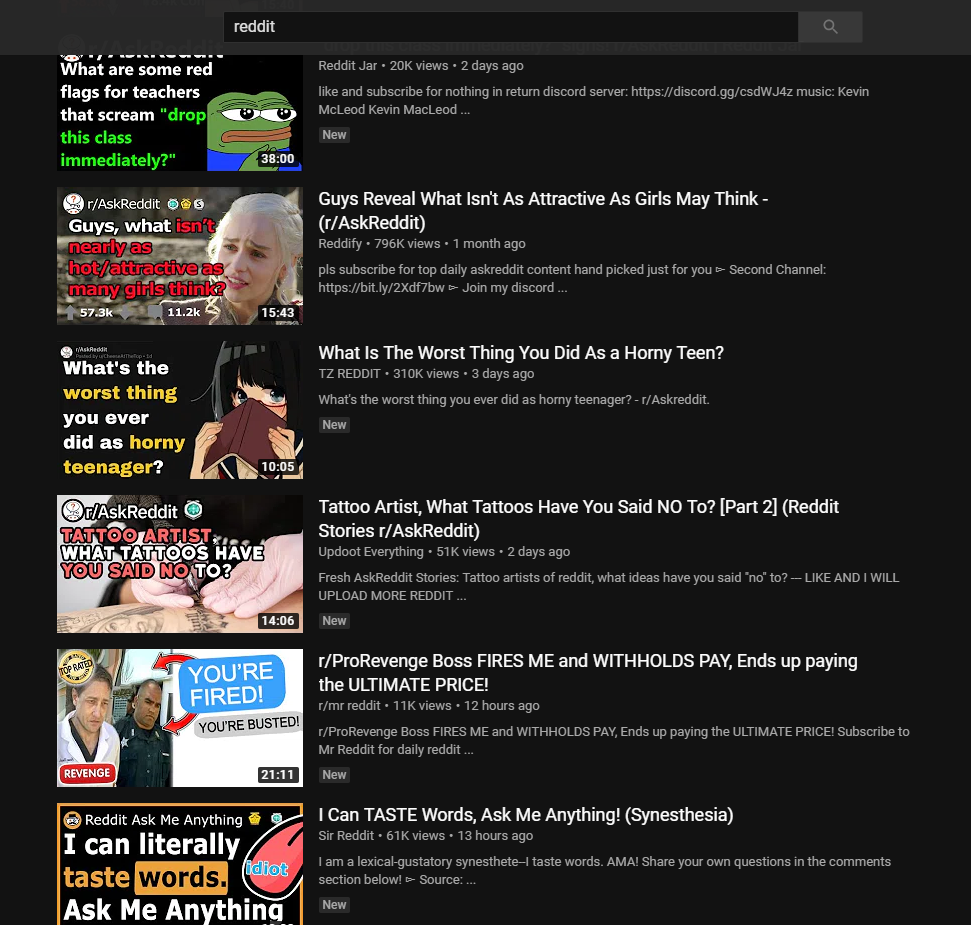
Every single one of these videos, literally all of them, are of almost the exact same format. It looks something like this:
- The video title is usually of the form:
<channel name/series name> - The thumbnail includes the subreddit icon along with the name of the subreddit.
- Sometimes the awards for the post are shown next to the subreddit name in the thumbnail.
- In the thumbnail, the title of the thread takes up the entire vertical and about 2/3 of the horizontal space. The text usually has different highlighting methods to make certain words stand out. (The green text in the example video).
- An image related to the name of the post is on the right-hand side of the thread title.
- Each video has a TTS engine reads out the text of the tread title/comment.
- While the text is being read, the text of the comment is incrementally revealed, usually one sentence at a time. Sort of like when you read with your finger except the video does it for you.
- A transition is added between each comment. Usually some sort of TV static.
- Intros/Outros are sometimes added.
- Sometimes background music is added.
None of those steps exercise any use of creativity. That makes it the perfect process to automate.
I decided that Java/Spring would be a great combo for this project. So expect lots of Java from here on out.
Here was my original plan:
- Scrape Reddit for the top posts of the day.
- Use some library to take images of the text sentence by sentence.
- Generate TTS for those comments.
- Drop the images and TTS into some timeline-based rendering API
- Spit out a video
- Profit?
Scraping Reddit
This is straight forward. Reddit offers a public API.
All that has to be done is to call https://reddit.com/r/<subreddit>/top.json and you get all the top threads for a
subreddit. My target for this project is /r/AskReddit.
Then once you have a threadId just call https://reddit.com/comments/<thread id>/top.json to get the top comments.
That’s it.
Generating Images
Scraping Reddit wasn’t so bad, no way images could be that hard… WRONG!!! I would estimate that around 50–70% of the time spent working on this project went towards image generation. I wouldn’t have thought it, but it appears to be uncommon to want to render HTML to pictures.
The first part of the generation is straightforward. The text of the comment has to be broken up into sentences and each sentence needs its own image. Then the images can be strung together to make something like this:

I had many ideas on how to go about this:
- Draw the text/image using
java.awt.Graphics. - Render locally generated HTML snippets.
- Take a screenshot from Reddit.com and add the text in part-by-part.
As an exercise to the reader, try to guess which methods worked and which didn’t. I tried all of them and only one kind of worked.
Method 1: java.awt.Graphics
How patient are you? Chances are, you do not have the patience required to implement this. Drawing such a simple image is a burden in awt. Even just drawing text that doesn’t look horrible requires the follow blob of code:
// Load the font
GraphicsEnvironment ge = GraphicsEnvironment.getLocalGraphicsEnvironment();
Font font = Font.createFont(Font.TRUETYPE_FONT, fontFile);
ge.registerFont(font);

// Turn on text anti-aliasing
graphics.setRenderingHint(
        RenderingHints.KEY_TEXT_ANTIALIASING,
        RenderingHints.VALUE_TEXT_ANTIALIAS_GASP);
graphics.setRenderingHint(
        RenderingHints.KEY_FRACTIONALMETRICS,
        RenderingHints.VALUE_FRACTIONALMETRICS_ON);

// Set the font size
Font newFont = font.deriveFont(font.getStyle(), fontSize);
graphics.setFont(newFont);

// Draw the string at x,y
graphics.drawString(text, x, y +g.getFontMetrics().

getAscent());
And that was just to draw a single string. Yeah, AWT is tedious. I don’t have the patience to redo HTML in awt so on to the next idea.
Method 2: Rendering HTML locally
This was actually the first method I tried because it looks straight forward. You extract the styled HTML from Reddit, add in some placeholders, and render it.
Extracting the HTML is made straightforward by some amazing tools:
The created snippet can be then exported to CodePen, jsFiddle or JS Bin with one click.
I did notice some issues with non-escaped unicode in CSS properties not being encoded properly. Instead
of content: "\uF100" it would be content: '"□"'. So after a bit of post-processing, the file is good to go.
So HTML extraction is complete. Then some placeholders are added into the HTML file. Then all that’s left is to render it.
Q: What could go wrong?
A: EVERYTHING
The only Java API I could find that claimed to render HTML was flyingsaucer. This library didn’t claim to work with CSS3, but I tried it anyway. The results where completely unusable.
But what about Chrome? I render hundreds of HTML pages a day with Chrome. How about I give that a try.
Chrome offers some appealing features in its CLI mode. It can be run in headless mode, meaning no visible browser window is opened, and it can screenshot a web-page. The only problem is that I don’t want the whole web-page, just the element I’m trying to render. So Chrome CLI is a no-go.
Method 3: Screenshotting the page
This is very similar to the approach at the end of method 2 except I’ve added on some more tooling. I probably could have gotten method 2 working, but I liked how this approach doesn’t require me to fix unicode literals every time Reddit does a redesign.
The idea here is as simple as it gets: Go to the comment URL. Empty the text of the comment. Add in a sentence. Screenshot the DOM element. Repeat.
To screenshot individual elements on the page, I used puppeteer. In their own words: “Puppeteer is a Node library which provides a high-level API to control Chrome or Chromium over the DevTools Protocol. Puppeteer runs headless by default, but can be configured to run full (non-headless) Chrome or Chromium.”
So it can control Chrome. But most importantly, it can “generate screenshots and PDFs of [DOM elements on] pages.”
To run Puppeteer, a separate Node.js application is required :(. This just needs to take in the link to the element and take a picture of it.
The essence of this application is summed up in the following bits of code:
Taking a screenshot:
// Get a box around the element that will be screenshotted
const boundingBox: BoundingBox = await this.page.evaluate(selector => {
    const element = document.querySelector(selector);
    ...
    const {x, y, width, height} = element.parentElement.getBoundingClientRect();
}, parentSelector);

... add boundingBox to screenshotOptions

const b64string = await this.page.screenshot(screenshotOptions);
Taking the incremental screenshots:
const textHeader = await this.page.$(textSelector)
const textDiv = (await textHeader.$x(".."))[0]

// Split by sentence
const parts: string[]
= splitString(await this.getHtml(textDiv))

// Set text to ""
await this.page.evaluate(e => e.innerHTML = "", textDiv)

// Add in text part by part
for (const part of parts) {
    await this.page.evaluate(
        (e, part) => e.innerHTML = e.innerHTML + part, textDiv, part)
    const base64String = await this.screenshotDOMElement(parentSelector)
}
And that works. It navigates to the page of the comment and takes the screenshots.
Generating TTS
Text-to-speech is a problem that has been solved over and over by so many different people. The problem is that nobody made their solution that good. So many of the TTS engines available, especially the free ones, where unusable.
Mary
Mary, a free TTS engine written in Java, has very poor sound quality:
Vocalware
Vocalware (Most common in Reddit YouTube videos) Has exceptionally better audio quality. I also noticed that they billed me 5 separate times for $100 before my trial period had expired. No thank you.
The only problem is the cost: Streams require a $100 minimum payment.
Amazon Polly
Amazon Polly Offers TTS at the same/better quality as Vocalware but has a much better pricing model. ~$0.03 for a 10-minute audio transcription.
Amazon has already written an amazing API for Java. So implementing the TTS is basically just this:
SynthesizeSpeechRequest synthReq = new SynthesizeSpeechRequest()
        .withText(ssml)
        .withVoiceId(voice.getId())
        .withTextType("ssml")
        .withOutputFormat(OutputFormat.Mp3);
SynthesizeSpeechResult synthRes = polly.synthesizeSpeech(synthReq);
return synthRes.

getAudioStream();
Rendering
I wasn’t able to find a suitable API to render videos in Java, so I had to write my own. This was way more fun than I expected it to be.
If you want to render a video and not pay large sums of cash, the go-to option is FFmpeg. There are enough options loaded into FFmpeg that you could create your own Sony Vegas from scratch (I kinda did). There are so many options available. The documentation page has 159,949 total words (https://wordcounter.net/website-word-count). For reference: Harry Potter and the Sorcerer’s Stone by J. K. Rowling is 309 pages and has 79,185 total words.
The other option is to use a frame server such as AviSynth. This offers a cool scripting language to edit videos. I learned about this too late into the project to fully explore what’s possible with it.
So FFmpeg it is. Onto the abstractions.
I wanted the editing API to be independent of the rendering API that way if FFmpeg goes out of fashion, I can swap it out for something else with relative ease. I wanted something like Sony Vegas or its clearly superior Windows Movie Maker. The most important aspect is being able to load in a file, move it onto the timeline, reposition the image in the scene, and add image filters like a stretch or shrink.
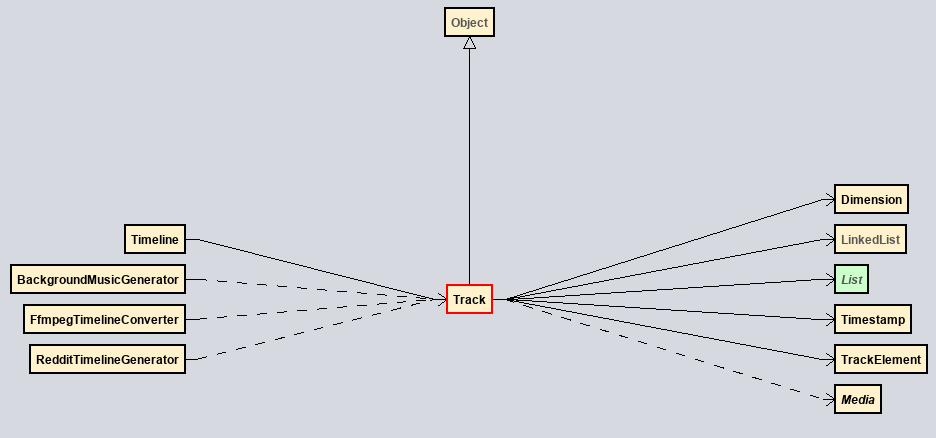
In short:
- A Timeline has many tracks.
- A track abstracts
Map<Timestamp, TimelineElement>. - A
TimelineElementis a filterable instance of aMedia
From timeline to FFmpeg command
So now there exists a timeline but there needs to exist a way to convert that timeline into an FFmpeg command. Here’s the gist of how this is going to go:
- Create media stream for each media element and apply timeline filters sequentially. Both visual and audio streams must be processed separately.
- Offset each filtered stream to the respective entry timestamp in the video.
- Overlay everything on top of one-and-other.
- Mix all filtered audio streams
- Output to file.

This is in no way optimal. It uses significantly more resources than it should. But it is the only way I found that is able to encode all the data I have from the timeline abstraction.
Writing this into an FFmpeg is borderline trivial. I wrote a class that takes in a Timeline and will compute a command
of the form ffmpeg <input files> <filter_complex> <output_streams> <misc flags> <output_file>
The only part of the command that is interesting is the filter_complex part. This is what takes the videos and mixes
them. This argument consists of many streams that are connected to each other. All resemble the
form (official filtergraph documentation):
[input_stream_1][...input_stream_n]filter_name=ARGS,filter_name=ARGS[output_stream]
A skeleton of the whole filtergraph looks like this
[1:a]anull[fa1]; // Apply audio filters (anull is a nop)
...
[12]setpts=PTS+0.0010/TB[fv12]; // Offset video and apply video filters (no filters present here)
...
[o12][fv13]overlay=enable='between(t, 0.0120, 0.0220)'[o13]; // Overlay to main stream
...
[fa1]atrim=start=0:end=0.8100,adelay=1|1,apad=whole_dur=7.3810[a0]; // Offset audio
...
[a0]...[a10]amix=inputs=11,volume=11[a] // Join audio streams
A full 8-minute video filtergraph can be viewed here.
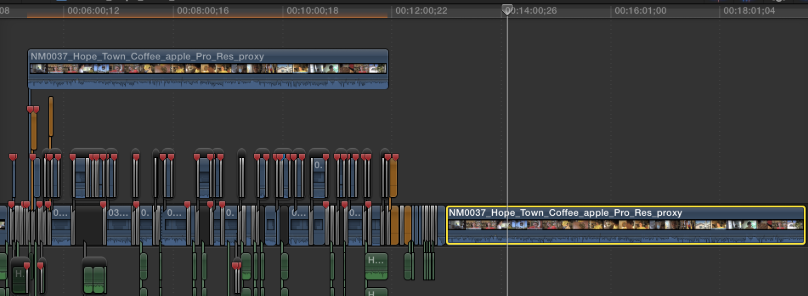
Putting it all together

Above is a partial render of a 5-minute video timeline. It’s pretty hard to get everything to fit in 1000 pixels. This is a look at how that timeline gets made.
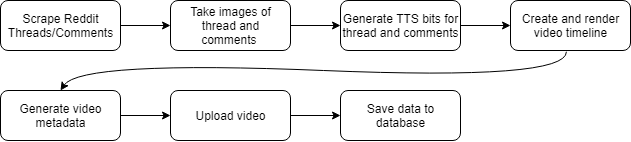
The flow of the program is very linear as you can see below:
It’s pretty straight forward, so I’ll keep this section short.
Moving to the cloud
The application is complete (in a sense) but it’s not 100% automated. Someone must run it for a new video to be generated. That just won’t cut it for me. I need a 100% hands-off solution.
Chrome and AWS Lambda
The way images were being taken was extremely slow. It could take around 5–10 minutes for a single video to be imaged. Moving this task to the cloud could greatly reduce the time required for this task.
Given that the imager was already a Node.js project, the goto solution was serverless. All that was needed was an extra yml file, and the project was in the cloud.
And I wish it were that easy. It turns out that Puppeteer, the library used for controlling a headless Chromium instance did not play well with AWS Lambda. The size of the bundled Chromium executable greatly exceeded the max size allowed by Lambda.
The solution arose with chrome-aws-lambda. This bundles a compressed version of Chromium that satisfies the space requirements of Lambda. There are other libraries that also claim to accomplish this goal but after through testing numerous different solutions chrome-aws-lambda worked the best.
The Java Part In ECS
Now that the imager is in the cloud, the Java portion of the application must go too. Amazon ECS and AWS Fargate is a no-brainer for this. It supports running Docker containers and automatically provisions resources to meet the demands of those containers.
Building a Docker container is a trivial task that needs little explanation. The cool part is that Docker will host one free private repository. These repositories are cool because they can be configured to automatically build from GitHub. So when I push to GitHub, Docker detects the push and builds the docker container, and that container is pulled with the next execution of the ECS task.
In ECS, a task can be defined and scheduled to run on a certain interval. This allows me to run my generation as often as I please. I chose to do an execution at 9AM and 3PM MDT.
The cost
Running code in the cloud is not free, or at least that’s what I thought. There are some amazing free-tier offers from Amazon that make this application extremely cheap to run.
AWS Lambda charges in GB-s. My imaging program uses ~2GB of ram and runs in ~10 seconds. This program is then executed maybe 80 times to generate a video. The cost would be:
This is not mentioning that Lambda has a 400,000 GB-s free tier so I can generate ~40,000 captures per month cost-free (minus data transfer rates).
ECS is a bit easier to calculate. A video takes about 12 minutes to generate on a 2 VCPU 4GB ram provision. At the time of writing, the rates are as follows:
| Item | Price |
|---|---|
| per vCPU per hour | $0.04048 |
| per GB per hour | $0.004445 |
So the cost per video is the following:
So the total cost of making a video is about $0.05 ($0.02 with free tier) without factoring in data transfer costs.
Refinement
This application could have been hacked together in a week. But I blew out that timeframe because I didn’t want to have to deal with the aftermath. I wanted to build this and check in on it every month. So many things had to be changed to support this idea. For instance, everything that interacted with an external API needed to have retries (spring-retry). Every external input to the program: Threads, Comments, Keywords, had to be tested with a variety of different inputs (quickcheck).
I found that this phase of the project dominated the majority of the overall development time. Possibly 80%????
Wrapping Up
This project was one of the most ambitious and complicated projects I had ever worked on. There are over 180 classes with a combined 7000 LOC at the time of writing this. It was a fun challenge. Here is the result:
This video was generated 100% without any interaction. The tags, description, thumbnail, title, and the first comment are all generated and uploaded via the application running the cloud.